
Unlocking Convenience with Lutron Pico Remotes
- Drew Blessing
- Mar 14, 2025
- 4 min read

Discover the convenience and flexibility that Lutron Pico remotes bring to your Control4 smart home system. These compact yet robust devices are designed for ultimate versatility—they even come with adhesive backing for mounting anywhere you need them.
In this post, we'll explore how these remotes can be leveraged in everyday scenarios. Whether it's switching up your music without leaving the shower or watering flowers with the tap of a button, discover how this versatile tool brings harmony and efficiency to your smart home lifestyle.

Pico in the Shower: Rock Out to Start your Day
Imagine starting your day with your favorite playlist. Don't like the next song? Want to crank it up? Placing a Pico remote in the shower keeps control at your fingertips.
Control Music: Easily start, stop, or adjust volume.
Enhance Experience: Enjoy a spa-like ambiance tailored to your mood.
Endless Opportunities: Go beyond music and program buttons to turn on the bathroom fan or any other function that's integrated with your Control4 system.
I've been using a Pico remote in my shower for over a year and it's one of my favorite smart home features. This setup not only elevates your shower experience but also showcases how Control4’s seamless integration can bring a touch of luxury to your everyday life.
Pico on the Porch: Effortless Flower Care
Managing outdoor tasks becomes a breeze when you can control water hose valves without leaving the comfort of your porch. If your house has a raised porch or deck and the hose bib is down below, use a Rachio Smart Hose Timer and the Smart Watering with Rachio driver to make your life easier.
Activate Water Hose Valves: Turn the hose on and off so you can water your flower pots.
Save Time and Effort: Avoid walking down the stairs, around to the hose bib, and back up just to water flowers.
Control Music and More: If you have outdoor audio, program the Pico buttons to change volume or skip tracks.


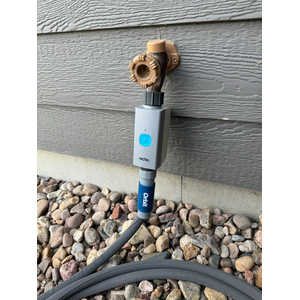


I have one Pico each on my front and back porches, tucked behind the siding so it's not intrusive.
Whether you’re watering your flowers or listening to music, this setup ensures that outdoor life is as convenient as it is effective.
For an added touch of automation, connect your hose to a drip system to water your flowers on a schedule or with the touch of a button.
Conclusion
Lutron Pico remotes offer a simple yet powerful way to enhance the functionality and convenience of your Control4 system. Whether you’re enjoying a customized music experience in the shower or taking the hassle out of watering, these devices bring smart control to everyday living.
For dealers, this integration opens up numerous opportunities to deliver unique, customer-focused solutions. With the step-by-step guide below, you have a solid framework to deploy these systems efficiently. We look forward to seeing the creative ways you implement this superpower of Control4 convenience.
What are your favorite uses for Lutron Pico remotes? Comment below to share!
Dealer Instructions
Below are guides to integrating and programming Lutron Pico remotes based on the use-cases described above. Adding drivers and new devices can only be completed a dealer with Composer Pro access.
Configure the Lutron driver and add the Pico remotes
Integrating Pico remotes with Control4 requires one of Lutron's hubs (Caseta, Radio RA2, Radio RA3) plus the number of Pico remotes needed for the customer's desired setup. The Lutron driver is provided directly by Control4.
Make sure the Lutron hub is configured and the Pico remotes are added to Lutron. Then, configure the Lutron driver in Composer Pro and ensure the Pico remote devices are added.
Instructions for this step can be found in the respective Lutron driver documentation. We recommend using the "Lutron LEAP RA2 and Caseta Processor" or the "Lutron LEAP Radio RA3" drivers. These can be found in Composer Pro driver search.
Configure shower music controls
Once the Pico remote is added to the project, find the device in the "Connections" tab.
Under 'Control Inputs' you will see control bindings for each button on the remote. The path/numbers will vary but will be in the format `/button/101`. Typically, the order of button number starts with the top button, then the middle round button, bottom button, and then the up and down buttons. This can be confusing at first.
Click on the desired button binding and map to an appropriate music action. I recommend using the Room Control driver connections for this purpose. Below are examples of the connections I used:
Map the first/top button to `<Room> - Control->PLAYPAUSE`
Map the third/bottom button to `<Room> - Control->SKIP FORWARD`
Map the fourth button to `<Room> - Control->VOLUME UP`
Map the fifth button to `<Room> - Control->VOLUME DOWN`.
Optionally, map another function to the second button. I mapped mine to the bathroom `Fan->Top Button Link` which will turn on the exhaust fan.

Composer Pro music control connections
Configure Rachio Smart Hose Timer controls
The water hose integration requires a Rachio Smart Hose Timer and the Smart Watering with Rachio driver. This driver is developed by Blessing Innovations.
Make sure the customer has configured the Rachio Smart Hose Timer in their Rachio account, and the Smart Hose Timer hub is plugged in and in range. Then, configure the Smart Watering with Rachio driver following the instructions in the documentation shipped with the driver.
After the driver is configured, follow these steps:
Find the Pico remote device in the "Connections" tab.
Under 'Control Inputs' you will see control bindings for each button on the remote. The path/numbers will vary but will be in the format `/button/101`. Typically, the order of button number starts with the top button, then the middle round button, bottom button, and then the up and down buttons. This can be confusing at first.
Click on the desired button binding and map to an appropriate Smart Watering action. Below are examples of the connections I used:
Map the first/top button to `<Smart Watering Valve>->On`
Map the third/bottom button to `<Smart Watering Valve>->Off`
Optionally map other buttons to other functions such as music/volume controls or whatever the customer requests.

Composer Pro watering control connections
Comments